
Chicken foot problems can significantly impact the health and well-being of your feathered friends.
Whether it’s bumblefoot, scaly leg mites, ingrown toenails, overgrown spurs, or too-tight leg bands, we cover each issue and even more.
We’ll share these common problems, how to identify them, their causes, treatments, and how to prevent them in the future.
Let’s get into it.
The Importance of Chicken Foot Health
The importance of chicken foot health cannot be understated. If your chicken has poor feet, their entire life and overall well-being will suffer dramatically.
Their feet are in direct control of their mobility. Chickens with injured or diseased feet may have difficulty walking, foraging, and accessing food and water, leading to stress and reduced quality of life.
Foot health even directly correlates to egg production. Foot problems can lead to decreased egg production due to discomfort and stress.
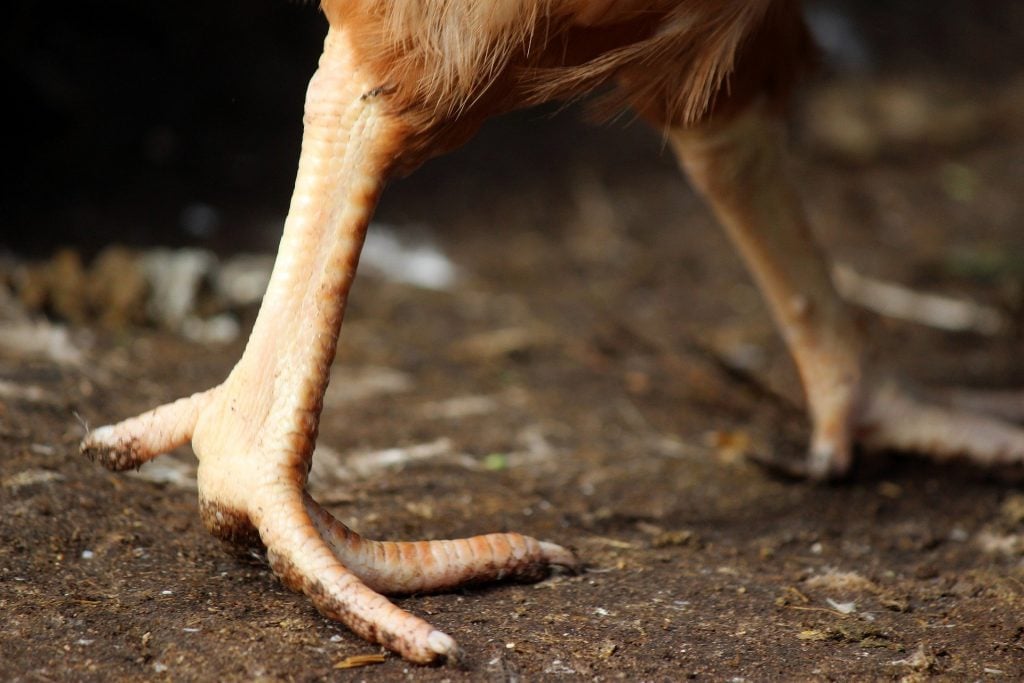
Know the Anatomy of a Chicken’s Foot
Understanding the different components of a chicken’s foot can help poultry enthusiasts and farmers better care for their feathered friends.
Toes and Claws
Chickens typically have four toes on each foot, though these five breeds will have five toes.
Their toes are equipped with sharp claws that serve various purposes.
The front three (occasionally four) toes point forward, while the fourth (or fifth), known as the hallux, faces backward.
These claws are essential for scratching the ground in search of food, maintaining balance, and perching.
Scales (Scutes)
The skin on a chicken’s foot is covered with scales. These scales provide protection and help reduce moisture loss.
They are commonly called “scutes” and can vary in size and texture between breeds. They also work to prevent frostbite to a certain degree.
Spurs
On some breeds, particularly in roosters, you will find bony protrusions called spurs on the back of the leg, just above the foot.
These spurs can be used for defense and are often larger in mature males.
Footpad
The central portion of the foot is called the footpad. It’s a thick, fleshy area that helps cushion the foot and absorb shocks while walking or perching.
Feathering
Chickens may also have feathers on their feet, particularly on the shanks and toes. This feathering can vary in length and density between different breeds.
Feathered feet help provide insulation and protection from cold weather. However, they are prone to forming snowballs or ice balls.
If your chicken walks in the snow and returns to the coop frequently, icicles or snowballs will form on the feathers, making your chicken very uncomfortable.
This can rip feathers out or make it nearly impossible for your chicken to walk if it gets too large.
Tendons and Muscles
Beneath the scales and skin, the foot contains tendons and muscles that control the movement of the toes.
These muscles allow the chicken to grip, scratch, and walk.
You’d be surprised at how well-developed these muscles are; chickens are constantly on their feet, which develops these muscles surprisingly well.
Nerves and Blood Muscles
Blood vessels and nerves run through the foot, supplying it with oxygen and nutrients while transmitting sensory information to the chicken’s brain.
Chickens with long, clean (clean as in “not feathered”) legs are much more efficient at cooling off during the summer.
Because of this, shorter-legged chickens tend to be more cold-hardy, while tall and long-legged chickens are better at surviving hot climates, especially in areas where humidity levels are lower.
Common Chicken Foot Problems
Here are some of the most common chicken foot problems that you may encounter with your flock along with its causes, symptoms, treatment, and preventative steps you can take to avoid them.
Bumblefoot
Bumblefoot, scientifically known as pododermatitis, is a common and potentially serious condition in chickens.
Causes
Bumblefoot primarily occurs due to bacterial infections, with Staphylococcus aureus being the most frequent culprit.
Bumblefoot is often associated with poor husbandry practices, unsanitary living conditions, and injuries. Here are some common causes:
Injuries
Minor cuts or wounds on the footpad can provide an entry point for bacteria.
These injuries can result from rough or uneven coop surfaces, sharp objects, or even excessive scratching.
Obesity
Overweight chickens are more prone to developing bumblefoot.
Excessive weight puts additional pressure on their feet, making them more susceptible to injury and infection.
Unsanitary Conditions
Dirty and wet living environments create an ideal breeding ground for harmful bacteria.
Chickens that walk on damp, dirty bedding are at a higher risk.
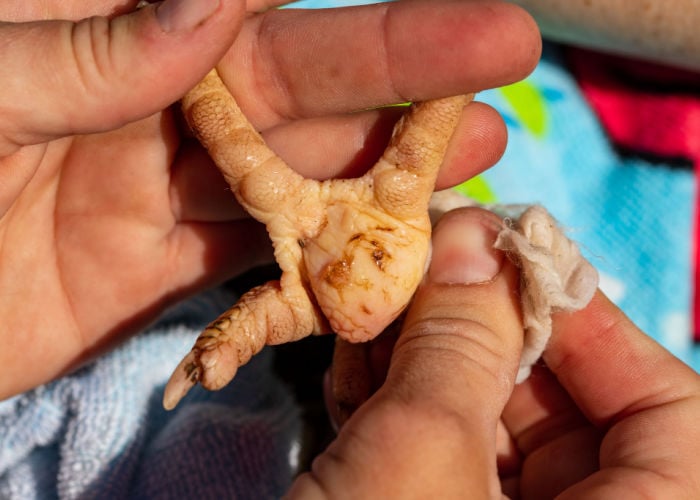
Symptoms
Identifying bumblefoot early is crucial for effective treatment.
Limping
Chickens with bumblefoot often exhibit lameness or a noticeable limp.
Swelling
The affected foot may appear swollen, red, and warmer than usual to the touch.
Signs of Pain or Sensitivity
Chickens may become sensitive to touch on the affected foot and may react with discomfort or distress when you examine it.
They may also sit or lay down more often, hide in the nesting boxes, or try to rest on the ground rather than on their perch. Or, they may stay on the perch for far longer than they usually do.
In some more serious cases, your chicken will stop eating or drinking because they are uncomfortable.
Scabs or Lesions
A scab or lesion, sometimes with a black or dark brown center, may be present on the footpad. This is the hallmark sign of bumblefoot.
Treatment
Prompt and proper treatment is essential to prevent the infection from spreading or becoming chronic.
Here is the best way to treat bumblefoot:
- Isolate the chicken to prevent further contamination of the wound and reduce stress on the bird. A large dog crate, or sectioned-off area of the coop, or an unused chicken brooder are good options for this temporary isolation.
- Soak the affected foot in warm, soapy water to soften the scab. Gently remove the scab with clean hands or a sterilized instrument. Be careful not to damage the healthy tissue.
- If possible, administer antibiotics, either orally or as directed by a veterinarian, to treat the bacterial infection.
- Cover the wound with a clean bandage and change it regularly. Apply an antibiotic ointment to promote healing.
Prevention
Preventing bumblefoot is preferable to treating it. Here are some of our best tips for preventing bumblefoot:
- Maintain a clean and dry living environment for your chickens. Regularly remove wet bedding and droppings to reduce the risk of bacterial growth. We have a comprehensive guide to cleaning and sanitizing chicken coops for you.
- Make sure that your coop floors and perches are smooth and free from rough edges or sharp objects that could cause foot injuries. Splinters are common culprits here, as are rough metal edges and loose wire (especially scrap pieces of welded wire).
- Offer more ramps with good footing whenever possible. If your chickens have to fly or jump to reach their roosts, consider lowering the roosts some, stair-stepping them up from the floor, or adding in a ramp that gives them plenty of good traction.
- Monitor your chickens’ weight and provide a balanced diet to prevent obesity, which can contribute to foot problems. Giving your chickens plenty of enrichment activities inside their run or allowing them to free-range are wonderful options for keeping your chickens’ minds and bodies healthy. Chicken tunnels are another helpful alternative.
- Routinely inspect your chickens’ feet for signs of injury or infection. Early detection is key to preventing the condition from worsening.
- Install well-designed, wide roosts to reduce pressure on their feet while sleeping. This was a mistake that I admittedly made for years, and I see many other chicken keepers make it as well. Roosts should be as wide as your fist, not the width of your finger. It’s better to use a wide 2×4 board rather than a narrow tobacco stick.
Scaly Leg Mites
Scaly leg mites, also known as Knemidocoptes mutans, are tiny parasites that infest the legs and feet of chickens (and other fowl, including turkey, guineas, and ducks).
These mites burrow under the scales on a chicken’s legs and feet, causing intense irritation and discomfort.
Causes
The primary causes of scaly leg mites in chickens are:
- Direct Contact with Infected Birds. Chickens can contract scaly leg mites through direct contact with infected birds, contaminated coop surfaces, or shared perches.
- Poor Hygiene. Dirty and damp living conditions provide an ideal environment for mites to thrive. Inadequate coop sanitation can contribute to infestations.
Symptoms
Identifying scaly leg mites in chickens is crucial for early intervention. Here are a few signs to watch out for:
Rough, Raised, Scaly Appearance
The scales on a chicken’s legs and feet become raised, rough, and crusty. In severe cases, the legs may appear deformed.
Swollen Legs
The legs may become swollen, leading to lameness or difficulty walking. Sometimes the legs will feel warm to the touch as well.
Itchy Legs
Infected chickens often exhibit signs of discomfort, such as scratching their legs against objects or picking at the affected areas.
This behavior will be erratic and seemingly non-stop.
Feather Loss Near or On Legs
Feather loss around the legs and feet may occur due to the chicken’s scratching and obsessive grooming behaviors.
Treatment
Effective treatment of scaly leg mites involves careful attention and consistent care.
- Quarantine. Isolate the affected bird to prevent the spread of mites to other chickens in the flock.
- Clean and Sanitize the Coop. Thoroughly clean the coop and remove any contaminated bedding or debris. If you were previously using hay or straw as bedding or enrichment activities, now is a good time to switch to wood chippings, shavings, mulch, or sand. This does not need to be a permanent change, but it will rid your flock of mites much faster.
- Begin Your Treatment of Choice. There are several treatment options, including:
- Topical Ointments. Apply a topical treatment such as petroleum jelly, vegetable oil, or specialized leg mite creams to the affected areas. These suffocate the mites and soften the scales.
- Ivermectin. Consult with a veterinarian for the appropriate dosage of ivermectin, an effective antiparasitic medication that can be administered orally or topically.
- Dipping. In severe cases, the chicken’s legs can be dipped in a solution of warm water and an approved parasiticidal solution, but this should be done under veterinary guidance.
- Repeat Your Treatments. Treatment should be repeated every 7-10 days until the mites are completely eradicated.
- Practice Good Environmental Management. Continue to maintain a clean and dry living environment to prevent re-infestation.
Prevention
Here are a few practices to adopt so you don’t have to deal with those awful mites again.
- Inspect and isolate (quarantine) new chickens for a few weeks before introducing them to your existing flock to prevent the spread of mites or other diseases.
- Maintain a clean coop by regularly removing waste, changing bedding, and cleaning perches.
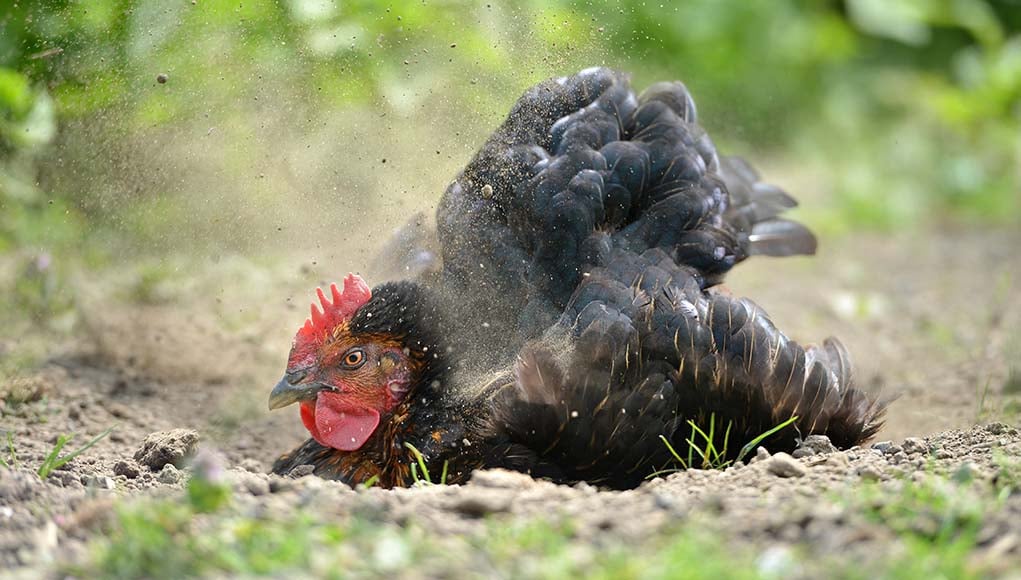
- Provide chickens with access to dust baths, which they will use to naturally rid themselves of mites and parasites.
- Routinely inspect your chickens’ legs and feet for early signs of scaly leg mites, and treat any affected birds promptly.
By practicing good biosecurity and maintaining a clean and comfortable environment for your chickens, you can significantly reduce or even eliminate the risk of scaly leg mites and keep your flock healthy and happy.
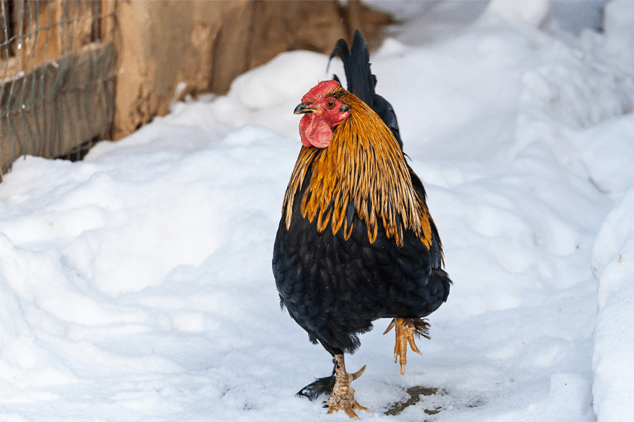
Frostbite
Frostbite in chickens occurs when their body tissues, usually in the extremities like the comb, wattles, toes, and spurs, freeze due to prolonged exposure to cold temperatures.
Causes
Here are the three most common causes of frostbite in chickens.
Extreme Cold
Prolonged exposure to freezing temperatures, especially in subzero temperatures, is the primary cause of frostbite in chickens.
High Humidity in Cold Weather
High humidity levels can exacerbate the risk of frostbite because moist air conducts heat away from a chicken’s body more effectively than dry air.
The temperature does not have to be excessively cold for your birds to experience frostbite if it’s exceptionally wet or humid.
Poor Ventilation
Inadequate coop ventilation can lead to moisture buildup, which can contribute to higher humidity levels and increase the risk of frostbite.
Symptoms
Discoloration
The affected areas, such as the comb, wattles, toes, or spurs, may appear pale, gray, or even black.
Swelling
Swelling of the affected areas is common, which can lead to a distorted appearance.
Cold and Pain
Infected body parts may feel cold to the touch and chickens may exhibit signs of discomfort or pain.
Blisters and Pustules
In some cases, fluid-filled blisters or pustules may form on the affected areas.
Treatment
Treating frostbite in chickens requires immediate attention to minimize tissue damage.
- Move the affected chicken to a warm, dry environment. Provide additional heat sources, such as heat lamps or heating pads, but ensure they are safely installed to avoid fires or overheating.
- Do not attempt to thaw frostbitten areas with hot water or direct heat, which is ineffective and incredibly painful for your bird. Instead, use cool to lukewarm (not hot) water to gently and gradually thaw the affected parts.
- Administer pain management medication if that’s available to you, under the guidance of a veterinarian.
- Isolate the frostbitten chicken from the rest of the flock to prevent pecking or further injury.
- Keep the affected areas clean and dry. Apply a topical antibiotic ointment to prevent infection and promote healing.
Prevention
Frostbite is painful and will often leave irreversible damage that is often cosmetic at the very least.
It’s far better to prevent frostbite than to try to retroactively treat it.
- Larger roosts are a surprising preventative option. If you have wider roosting bars, your chickens can “sit” down on their feet, and the bar will maintain the chicken’s warm temperature easier. If the toes wrap all the way around the bar or stick, then the bottom parts of the feet or toes will be exposed to the cold.
- Insulating the coop is another major improvement that will keep your chickens considerably happier in extreme temperatures, both hot and cold. Seal out drafts, but ensure proper ventilation near the roof of the coop.
- Maintain proper ventilation in the coop to control humidity levels and reduce condensation, which can lead to frostbite. Make sure that the vents are well above your roosting bars—you don’t want that fresh cold air to blow directly on your sleeping birds at night.
- While it may feel counterintuitive, make sure your coops aren’t overcrowded. Allow enough space in the coop for chickens to move around. Your chickens will naturally form cliques, so it’s important your birds can freely move about and find the friends they want to huddle up with overnight. Don’t worry—once they’re with their preferred group, they’ll lean in close and warm up on their own.
- Use safe heat sources like heat lamps or heated waterers to provide supplemental warmth during extremely cold periods.
- Regularly inspect chickens for signs of cold stress, such as puffing up their feathers, and take appropriate measures to keep them warm.

Cuts, Abrasions, Infections
Causes
Sharp Objects
Chickens can easily injure their feet on sharp objects, such as nails, wire, or thorns in their coop or outdoor environment. Do your best to “baby-proof” your coop and run as best as you can.
If you allow your birds to free range, be on the lookout for scrap or loose pieces of metal or wire that they could hurt themselves on.
Rough Surfaces
Walking on rough or abrasive surfaces in excess can lead to cuts or abrasions on the footpads. Avoid keeping your birds directly on concrete or asphalt alone.
They should have access to softer footing, such as bare dirt, mulch, grass, straw, loose hay, sawdust, or sand.
If you need to use concrete or asphalt as your base for the coop or run, cover it with bedding to help protect their feet.
Stressful or Overcrowded Coops
In overcrowded or stressful conditions, chickens may peck at each other’s feet, leading to injuries. Take a moment to read how much room chickens need in their coops, nesting boxes, roosting area, and runs.
Poor Hygiene
Dirty and wet living conditions can create an environment conducive to bacterial infections. Clean your coop regularly, or responsibly begin using the deep litter method.
Symptoms
Identifying cuts, abrasions, and infections on chicken feet is essential for swift and appropriate intervention.
Limping
Infected chickens may limp or favor one foot.
Swelling
The affected foot may appear swollen, red, or warm to the touch.
Pain and Sensitivity
Chickens may react with discomfort or distress when their feet are touched.
Visible Wounds
Cuts or abrasions may be visible on the footpads, toes, or other parts of the feet. If you don’t immediately spot the issue, pick your chicken up and look closer.
Don’t forget to check the thighs, and gently look beneath the feathers too.
Pus or Discharge
In cases of infection, pus or discharge may be present around the wound.
Treatment
- Isolate the affected chicken to prevent potential pecking from other flock members and to reduce stress.
- Clean the wound gently with warm water and mild soap to remove debris and reduce the risk of infection.
- Apply an over-the-counter antibacterial ointment, such as Neosporin, to the wound to prevent infection. Make sure it does not contain any pain-relieving ingredients like lidocaine.
- Cover the wound with a clean and sterile bandage to protect it from further injury and contamination. Change the bandage regularly.
- If the wound shows signs of infection, consult with a well-versed chicken expert, or a specialized veterinarian to determine whether antibiotics are necessary.
Prevention
- Regularly inspect the coop for sharp objects, such as nails or wire, and remove them promptly.
- Ensure that coop floors and perches are smooth and free from rough edges that could cause injuries.
- Provide enough space in the coop to reduce overcrowding and minimize the chances of pecking injuries.
- Maintain a clean and dry living environment to prevent bacterial infections. Regularly change bedding and remove waste.
- Routinely inspect your chickens’ feet for signs of cuts or abrasions. Early detection allows for prompt treatment.
- Trim excessively long toenails to prevent them from curling and causing injury.

Ingrown Nails
Causes
Genetics
Some chicken breeds are more prone to ingrown nails due to their genetics, with breeds known for feathered feet being more susceptible.
Improper Trimming
Failure to trim a chicken’s toenails regularly can lead to overgrowth and ingrown nails.
Injury or Trauma
Injuries to the nail or toe can cause the nail to grow abnormally and become ingrown. This is more common if you allow your chickens to roam with larger animals, such as goats, sheep, cattle, or horses.
They may step on your chickens’ feet and trigger an ingrown toenail for your birds.
Symptoms
Limping
Chickens with ingrown nails may limp or favor the affected foot.
Swelling
The toe or area around the nail may appear swollen, red, or irritated.
Pain and Discomfort
Chickens may exhibit signs of discomfort or pain when they try to walk or stand on the affected foot.
Most of the time this will not progress to the point that your chicken refuses to walk or move around, but it will likely inhibit foraging, so please pay close attention to your flock’s behavior.
Visible Ingrowth
You may notice that the nail has curved and grown into the surrounding tissue.
Infection
In severe cases, infection may occur, leading to pus or discharge around the ingrown nail.
Treatment
- Remove the affected chicken from the rest of the flock to prevent pecking or further injury.
- Gently soak the affected foot in warm, soapy water to soften the nail and surrounding tissue. This makes it easier to manipulate the nail.
- Using clean and sterile nail clippers or scissors, carefully trim the ingrown portion of the nail, taking care not to cut too close to the quick (the pinkish area within the nail).
- Apply an over-the-counter antibacterial ointment to the affected area to prevent infection.
- Cover the wound with a clean and sterile bandage to protect it from further injury and contamination. Change the bandage regularly.
- If the chicken appears to be in pain, move them to a smaller coop or cage with plenty of food and water close by so they don’t need to walk as much.
- If an infection has developed, consult with a veterinarian or a local chicken expert to determine whether antibiotics are necessary or possible for your bird.
Prevention
- Trim your chicken’s toenails regularly to prevent overgrowth. Use appropriate nail clippers designed for poultry.
- Be aware of your chicken’s breed tendencies and monitor those with feathered feet more closely. If you notice that a pattern is developing in your flock’s lineage, consider replacing your rooster, or incubate eggs from a local friend or neighbor’s flock where ingrown nails are not regularly occurring. Genetics matter more than you assume!
- Keep a clean and dry living environment to reduce the risk of injuries and infections.
- Provide safe and comfortable roosts for your chickens to minimize the risk of injuries that could lead to ingrown nails.
- Routinely inspect your chickens’ feet for signs of ingrown nails or other foot issues. Try to figure out exactly what is causing these ingrown nails so you can stop it from happening again.

Overgrown Spurs
Overgrown spurs in chickens occur when the keratinous sheath covering the bony spur on the leg becomes too long and curling.
Causes
Several factors can contribute to this condition.
Genetics
Some chicken breeds are predisposed to longer and faster-growing spurs.
Lack of Wear
In free-range or pasture-raised chickens, natural wear and tear from scratching, foraging, perching, and intentional filing usually keep spurs in check.
However, confined chickens may not have these opportunities for natural wear or intentional spur filing.
Unbalanced Nutrition
Poor nutrition can affect the rate of keratin growth, potentially leading to overgrown spurs.
Symptoms
Identifying overgrown spurs in chickens is essential for timely intervention.
Curled Spurs
Overgrown spurs appear long, curved, and sometimes pointed. They may curl around, causing discomfort to the chicken.
Lameness
Roosters with severely overgrown spurs may experience lameness or difficulty walking.
Discomfort
Chickens may display signs of discomfort or pain when walking or attempting to perch.
Injury
Overgrown spurs can lead to injuries, such as scratches or punctures in the skin, in other birds or even in humans if the chicken becomes aggressive.
Treatment
- To trim the spurs, you will need to restrain your rooster. Wrapping him in a towel or having someone help hold him can be useful. Do this at night, if possible, so it’s easy to pick your bird up off the roost without any fuss or fear.
- Using clean and sterile clippers designed for poultry, gently trim the overgrown portion of the spur, taking care not to cut into the quick (the blood vessel and sensitive tissue inside the spur).
- After trimming, use a nail file or emery board to smooth the edges of the spur to prevent sharp points that could cause injury to himself, flockmates, or anyone he may potentially attack. This is a critical step if you have smaller children.
- You can apply an over-the-counter antibacterial soap or ointment, if you desire.
- Continue to monitor and trim the spurs as needed to prevent them from becoming overgrown again.
Prevention
Preventing overgrown spurs in chickens is important for their comfort and well-being. Here are some preventive measures:
- Routinely inspect your chickens’ spurs to check for signs of overgrowth.
- If you notice that a chicken’s spurs are getting too long, trim them as needed. Aim to trim every few months, or as required, depending on the growth rate and breed tendencies.
- Provide a balanced and nutritious diet to support healthy keratin growth.
- If possible, allow chickens access to outdoor environments with natural surfaces for scratching, foraging, and perching, which can help naturally wear down their spurs.

Too Tight ID Bands or Zip Ties
Chicken ID bands, often made of plastic or metal, are commonly used to distinguish individual birds in a flock.
They are completely invaluable in breeding programs where identification is paramount.
You already know what causes too-tight ID bands or zip ties on the legs, so let’s learn how to help your chicken if you make a mistake with these items.
Symptoms
Swelling
The area below the band may appear swollen or constricted.
Limping or Lameness
Chickens may exhibit signs of lameness or difficulty walking due to the discomfort caused by the tight band.
Irritation or Sores
The band may chafe the skin or cause sores, which can become infected.
Skin Discoloration
The skin beneath the band may change color, becoming reddish or even purple.
How To Remove Bands or Ties
- Use a lubricant to try to slide it off. Cooking oil, butter, vegetable or animal fats, or petroleum jelly are good options.
- If it is plastic, use a pair of side-nip toenail clippers (for humans is fine), or narrow scissors to try to cut it off.
- If it is metal, use tin snips or a sharp pair of needle-nosed wire cutters.
- You can soak the foot in epsom salt and warm water for temporary pain relief and to reduce swelling.
- If the band is embedded, you may be able to ask animal control or even first responders (if they are not busy, be sure to ask politely too) for their help. They have likely experienced a similar situation with people and may have the tools and knowledge to help you.
In the future, make sure that you change out leg bands on time as your chickens grow up so they don’t become too tight.
And do not use zip ties as ID tools because it is too easy for them to accidentally click down and become uncomfortable.
Final Thoughts on Chicken Foot Problems
You can prevent nearly all chicken feet-related issues by simply being proactive about implementing good biosecurity practices, keeping a clean, safe, maintained coop, avoiding overcrowding, and offering a nutritionally balanced diet.
Of course, having a good education on chicken health helps, and if you’re reading this, then you’re already on top of that.