
Once you get an egg incubator, I think you can officially be labeled a ‘chicken addict’!
I always said I would never get an incubator – now I have two.
The fun of hatching your own chicken eggs is like having Christmas every day.
There are lots of different types of incubators out there, ranging from basic (still air) to fully automatic versions.
In this article, we will break down the best egg incubators, the types, and the pros and cons of each.
We will also walk you through the incubation process and hatching eggs. There are certain things that need to be done to ensure the best hatch possible, so we have presented them here.
Egg Incubators Reviewed In This Guide
| INCUBATOR | CAPACITY | STYLE | OUR RATING |
|---|---|---|---|
| Brinsea Mini II Advance Incubator | 7 eggs | Circulated Air | Check Price |
| HBlife Egg Incubator | 9 eggs | Still Air | Check Price |
| Brinsea Maxi II Advance Automatic Incubator | 14 eggs | Fully Automatic | Check Price |
| HovaBator Starter Egg Incubator Combo Kit | 42 eggs | Still Air | Check Price |
| Farm Innovators Circulated Air Incubator | 41 eggs | Circulated Air | Check Price |
| Brinsea Ovation Eco Automatic Egg Incubator | 28 eggs | Fully Automatic | Check Price |
Shop for Egg Incubators on Amazon


Chapter 1
Choosing the Perfect Incubator

Chapter 2
Gathering and Preparing the Eggs

Chapter 3
How to Incubate Chicken Eggs
Choosing the Perfect Incubator
Best Still Air (Basic) Incubator
Digital Fully Automatic Incubator for Chicks

Still Air Egg Incubator by HBlife
- Affordable and robust entry-level incubator
- Ideal for small hatch sizes and first-timers
- Easy to control temperature gauge with digital display
Before we start it’s worth saying – the cheaper the incubator the more work there is for you.
Checking of temperature/humidity several times a day, turning the eggs several times a day – it can be difficult to do if you are working during the day.
Basic incubators are cheap, easy to use, and generally work pretty well.
They will have a heating element and perhaps a fan. They also have water channels and a platform on which to rest the eggs.
The still airbox is exactly what it says. There is no circulation of the warmed air throughout the box.
This can lead to some areas of the box having warmer or cooler spots. If you remember your science lessons from school you will remember that warm air rises above the cool air.
The variance in temperature can be as much as 5 degrees; this can affect hatching.
Best Circulated Air (Intermediate) Egg Incubator
Programmable Automatic Circulated Air Incubator

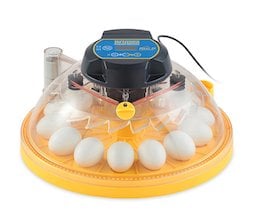
Brinsea Mini II – Advance Automatic Egg Incubator
- Has a digital control panel to monitor temperature and humidity
- Automatic fan to control and keep air temperature stable
- Counts down to hatch day and features an auto-stop after this date
This is a step up from still air. The warmed air is circulated throughout the box so the heat is more evenly distributed by the fan. They are also known as ‘forced air’ incubators.
These units contain a small fan which ensures the air temperature is as even as possible. I have had very decent hatches using one of these.
Best Medium Automatic Egg Incubator: Brinsea Maxi II
Digital Fully Automatic Incubator for Chicks
Brinsea Maxi II – Advance Automatic Egg Incubator
- Fully automatic incubator which will improve your hatch rates
- Controls humidity and has a convenient external top-up slot
- Programmable automatic egg turning
These usually have a lot more ‘bells and whistles added to them. They can vary from small and easy to use, to larger and a bit more complex.
The advanced incubators take a lot of the anxiety and guesswork out of incubating.
If you have ever used an incubator before, you are aware of the need to keep the temperature and humidity at certain levels, which means checking on the incubator at least three or four times a day.
These advanced models hold temperature and humidity much steadier than the basic models – this makes them much more efficient, cost-effective, and appealing.
They come in a wide range of sizes from a 7 egg capacity upwards to around 56 or so eggs.
If you are able to afford the cost they are much more successful in the hatching department.
The next part is going to walk you through the incubation process giving you some tips and tricks along the way.
We are going to assume you have a circulated air incubator.
If you haven’t yet got one, your next purchase should be a fan kit; it will be well worth the money.
Best Egg Incubator: Farm Innovators Model 4250
Fully Automatic Large Incubator for Chicks
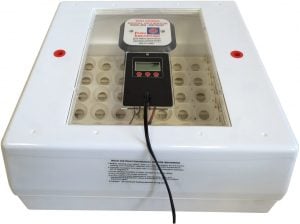
Farm Innovators Circulated Air Incubator
- Has automatic Egg turner
- Has set countdown timer
- Displays the current temperature and humidity
If you want to go all out with a larger than normal clutch then this egg incubator should be your go-to.
The Farm Innovators incubator has a built-in countdown timer. Now I’m a bit of a toe-tapper, so if you’re like me, this is great because I can monitor each day or couple of days.
Another thing I liked about this incubator was the ability to add water, so I can keep the humidity consistent without having to pop it open.
Gathering and Preparing the Eggs

If you are going to be hatching your own chickens’ eggs there are a couple of things to do to ensure the eggs are fertile.
You might want to crack open a couple of eggs prior to selecting the chosen eggs.
How do you know if the egg is fertilized? Stare intently at the yolk – you should see a small, whitish circular area that looks like a bullseye.
If you have a bullseye, it is fertilized, if you just have a small white spot, not fertile.
When you gather up the eggs, try to choose eggs that are not soiled.
If at all possible you do not want to clean the eggs before setting them but you certainly don’t want dirty eggs in the incubator.
Avoid eggs that are overly large or small, misshapen, cracked, or have thin shells. All of these things will affect the viability of the embryo.
Collect the eggs 2-3 times /day, especially in hot weather so they can be stored at the optimal temperature and humidity. Always store them with the pointed end downwards and remember to turn them daily.
I simply elevate one side of the box one day and the other side the next day. The longest you should store eggs is around 7 days. Every day after that decreases the likelihood of a successful hatch.
A brief note on eggs that have been shipped before reaching you – they will need to be set aside for 24 hours to allow the contents to settle back into place.
The hatch rate from shipped eggs is poorer than a home hatch. Please don’t automatically blame the seller – the postal service is not always gentle with handling.
Lastly in this section, do not mix eggs – you cannot successfully hatch chicken, duck, quail, and turkey altogether.
Each species has differing requirements for hatching conditions and times.
How to Incubate Chicken Eggs
Egg Incubating Pre-Check List
Make sure you have everything you need before you start:
- Incubator – test it. Make sure it works as it should, it is important to try and set the humidity and temperature before you set the eggs.
- Extra thermometer and hygrometer – strictly speaking, these aren’t necessary, but helpful to ensure your heat and humidity are just right.
- A safe, secure place to put the incubator for the next 3 weeks. It should be placed in an area where the temperature is fairly constant – away from windows so that the sun cannot overheat the box.
- Egg turner – unless you are turning by hand, which is time-consuming and needs to be done at least three to five times a day.
- Water – to fill the channels at the bottom of the incubator. This is usually every couple of days depending on your humidity.
- Candling device – you can buy special candling lights; we share our favorite later on in the article.
Fire up the Egg Incubator!

Set the incubator up and run it for about 24 hours in advance. This gives you time to get the temperature and humidity set to the number recommended in the directions.
In still air incubators, it is usually around 101-102F and 99-99.5F for circulated air incubators.
Get your eggs ready once the incubator is good to go. Let the eggs gradually rise to room temperature before placing them in the incubator pointed end down.
If you are going to be hand turning your eggs, this is a good time to mark one side of the egg with an X.
This will ensure you don’t forget which side was ‘up’ each time you turn. Mark the eggs in pencil (non-toxic) and keep a record of your turning frequency.
Always wash your hands prior to turning the eggs – germs will thrive inside the incubator as it’s the perfect environment.
Once your eggs are in the incubator, let the temperature rise back to your pre-set level.
Check-in a couple of hours to make sure the temperature and humidity have stabilized – you may have to make small adjustments because of the added eggs.
The incubation process will take 21 days so it’s time to start the countdown.
Checking the Eggs
The Best Egg Candler Tester
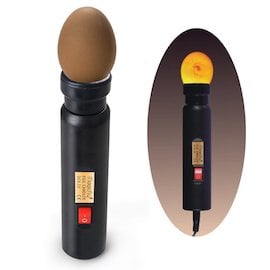
Egg Candler Tester by Magicfly
- This candlelight allows you to easily check for fertilized eggs
- Gives you an extremely clear view of the egg’s contents
- Shows much more detail than a regular flashlight
Obviously, you will be visually checking on your eggs each time you visit the incubator.
Resist the urge to take the lid off and try to candle every day. This dramatically affects temperature and humidity stability and by extension hatchability.
Most folks candle between Day 5 – 12 to see if the egg is progressing. The best time for embryo visibility is Day 8 onwards.
It is very important to keep the environment within the incubator as stable as possible.
Temperature is usually the easiest to control, the humidity is a bit trickier but equally as important.
Depending on your level of commitment and comfort, there are three ways to try and keep the humidity at optimum levels.
- Firstly – follow the directions for the incubator model you have. This is a satisfactory method for regular eggs.
- Secondly – you can keep a humidity chart and adjust the humidity level to the accepted guidelines for that particular species. This is good if you are hatching quail, duck, etc. something other than chickens.
- Thirdly – for expensive or rare eggs you will need to weigh the eggs to compare against an ideal weight loss chart. This is time-consuming and quite particular.
The humidity needs to be at 40-50% until Day 18, and then the humidity is raised to 70% for the final three days.
Patience, patience, and more patience
The hardest part is waiting! You can use this time well by making sure everything is in place for your chicks when they hatch.
Make sure you check to see if the heat lamp/electric hen heat plate is working, the brooder is set up ready to receive, and that you have sufficient fresh bedding, food, and electrolyte supplement for water.
Lockdown and Hatching
You may have heard or read of someone putting their incubator on ‘lockdown’ – what is that?
Lockdown happens on Day 18 – this is a busy day.
Your incubator directions will tell you that you need to increase the humidity to 70% now.
This is usually done by filling all of the water channels and adjusting the vents until you achieve the magic number.
You should not open the incubator again unless you need to refill the water. This is also the day you turn off the egg turner, remove it and place the eggs on the tray provided.
This is to help the chick adjust itself inside the egg to prepare for ‘pipping’. The chick has to turn a fairly complex maneuver in order to align its head with the air cell.
Once it has done this, it will ‘pip’ into the cell and take its’ first breath. The chick will then proceed – slowly, to pip the shell with the ‘egg tooth’.
The ‘egg tooth’ is a small appendage to the beak for this very purpose. After the chick has hatched, the egg tooth will fall off.
Day 21 – Hatch Day!

This is the day that the chicks should start to appear. Don’t get alarmed if they don’t appear right away, remember that a day to the chick is 24 hours, so if you put the eggs in at 10 pm at night, this is the time you can expect some action.
Sometimes you can hear them peeping at each other as if to encourage them to break free of the shell. You can try peeping back at them for encouragement – I do!
They look very bedraggled when they first break out, but they will dry quickly inside the incubator.
You can leave them in the incubator for 24-36 hours after hatching without worry. They have sufficient reserves to live on for this time; in fact, they can go as long as 72 hours, but personally, I would not do this.
Once you have a few fluffy dry chicks in the incubator, you will need to remove them quickly to make room for others to hatch and for the wet ones to dry, but remember you still need to keep the humidity high for those that haven’t hatched yet.
Since you collected eggs from succeeding days, you are going to get chicks hatching closely but not all the same time. A ‘normal’ hatch should be completed within 24-48 hours of the first appearance.
You should leave your incubator on for a couple of days beyond your hatch date “just in case”.
If you have chicks that seem to be ‘stuck’ after the external pipping and not making any progress the experts say you should not help them out.
That is extremely hard to do.
All of the chicks I have ever helped out have died or been deformed in some manner. It is a personal choice but be prepared for the worst.
Make sure to read our guide on caring for chicks here
The Best Egg Incubators: Summary
My best advice to you is to buy the best incubator you can afford.
While a small digital automatic incubator may seem expensive, it will save you money in the long term, especially if you plan to hatch a lot more eggs.
The cheapest and most efficient incubator I have ever used is a broody hen of course! She will do all the work for you for free and do a splendid job of it and take care of the chicks, what more could you want?
It can become very addicting to hatching eggs, but please spare a moment’s thought as to what you are going to do with all those chicks.
If you have a rare or popular breed selling may be an option, but if you have ‘barnyard mix’ birds, don’t expect more than a couple of dollars per chick.
Let us know in the comments section below your experience with incubators and hatching eggs…
WANT TO SHARE THIS?


What is the optimal temperature for eggs while you are gathering enough to fill your incubator?
Hi Claudia,
You can either keep them in a clutch (if you have a broody hen). Or you can keep them somewhere cool (not in a fridge!).
Somewhere between 40º to 50ºF will be fine, but try to incubate as soon as possible.
Claire
The perfect incubator is one that doesn’t need water to be added with no lockdown and no counting days to hatch and the drier the better!
Great and detailed write up.
How large of an incubator do I need for 12 hens?
It depends on the type breed of hens you have. If you have prolific layers I would get a larger one, but first I recommend monitoring how many eggs you are gathering from them over time and gauge from there what you need.
Claire
Can humidly destroy eggs if it exceeded 60 and below 30
Ultimately, you will need to monitor and control temperature and humidity, and have some process for turning eggs. Incubators that have these features integrated are often more expensive, where those with fewer features are less expensive.