
Egg candling is a neat, cheap, and easy way to discover what is happening inside the egg, but how do you do it?
Here you will find the complete guide on what candling is and when and how to perform it.
I will also explain some of the mysteries behind candling and help you get proficient at this skill, which is extremely useful for incubating and hatching.
Do you have to candle an egg?
No, really, you don’t, but if you can, it takes some of the guesswork out of hatching and can help you to improve the chances of subsequent hatches.
If you have had problems with bad hatches in the past, candling can sometimes help to see what goes wrong and give you some ideas to try to fix the problem for subsequent hatches as well.
What Is Egg Candling, And Why Do It?
Candling an egg allows you to see in a limited way what’s going on inside an egg at particular points along the way to full development.
It is not a fail-safe way to tell what’s happening inside the egg, but using your finely tuned observational skills, you can get a pretty good idea of progress or problems.
Candling can give you an idea if the egg is progressing or whether there is a problem. As its’ name implies, originally, candling was done with a candle!
Nowadays, it is done with a small, powerful light that you can shine against and through the eggshell.
There are several different types of candler depending on what you want or need.
We have a top pick section for you later in the article to help you pick through the numerous choices available.
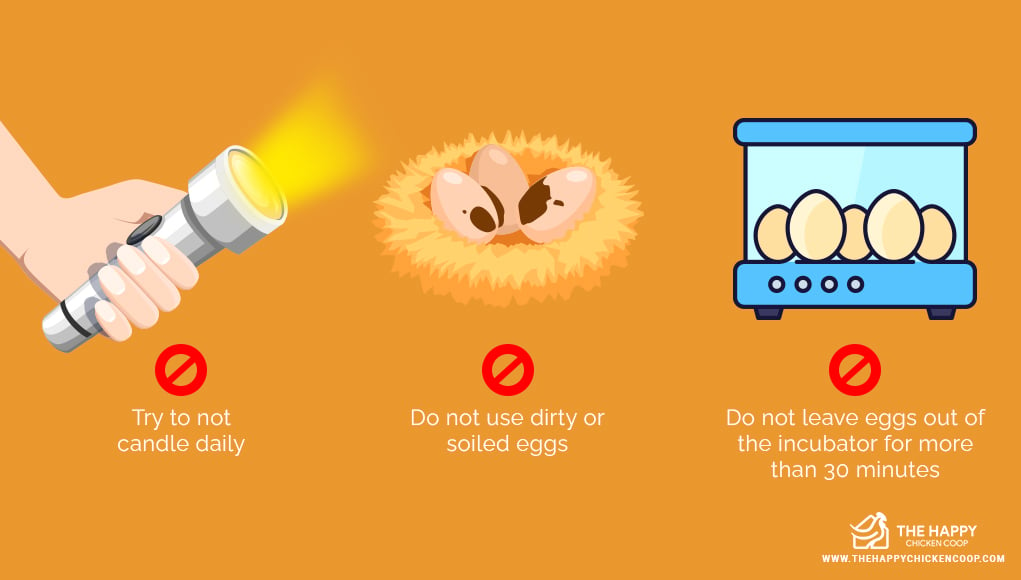
Things Not To Do
- As tempting as it may be, try not to candle daily. It can influence growth and development from repeated interruptions.
- Do not use dirty or soiled eggs.
- Do not leave eggs out of the incubator for longer than 30 minutes.
Limitations Of Egg Candling
Exactly how much you can see is limited in most cases. For example, it is doubtful that you will see anything happening inside the egg before Day #4.
We may think that 21 days to hatch is really fast (it is), but the changes happening inside the egg are small and difficult to monitor on a day-to-day basis even though they are continuous.
Eggs that are particularly dark in coloring – Black Copper Marans or Welsummers spring to mind are tough to see because of the darkness of the shell pigment. These types of eggs need a lot of practice to get proficient in ‘reading’ them.
Blue or green eggs can also cause some difficulty reading them because of the pigment being inclusive in the shell.
Candling will not tell you if the egg is fertilized until Day 4 or so, when the veins start to develop.
Marking The Eggs
Using a regular pencil – no marker pens, the toxins can leach through the shell – you can mark the eggs as you desire. I usually number them 1 -12 etc. You can mark on the shell the size of the air cell, which breeds, color.
Keep a notebook and make frequent notations on your eggs. This way, you can determine if you need more humidity, less humidity or note any other thing that may occur, such as the early demise of the embryo, power outage, or even unusual weather events.
Believe it or not, but the weather can exert subtle effects on the hatching eggs.
Egg Candling ‘Milestones’
There are some definite high points along the journey to hatching. If your candle regularly, you will become very proficient at seeing these stages and judging how the egg is progressing.
To candle properly, you will need your candler and a dark room. The darker, the better. It will help you see the egg contents.
The first time you will candle the egg is when you set the eggs in the incubator. Why? You need to know that all the eggs going in are intact and free from micro-cracks in the shell.
Cracks or hairlines in the shell allow bacteria into the egg contents, which are an ideal breeding ground for bacteria – this is where you get exploding eggs!
You should discard any cracked or ‘iffy’ eggs. Any eggs that are wrinkled, deformed, too pointed, or too round should also be discarded – they can lead to hatching difficulties.
You should handle all eggs before setting them in the incubator.
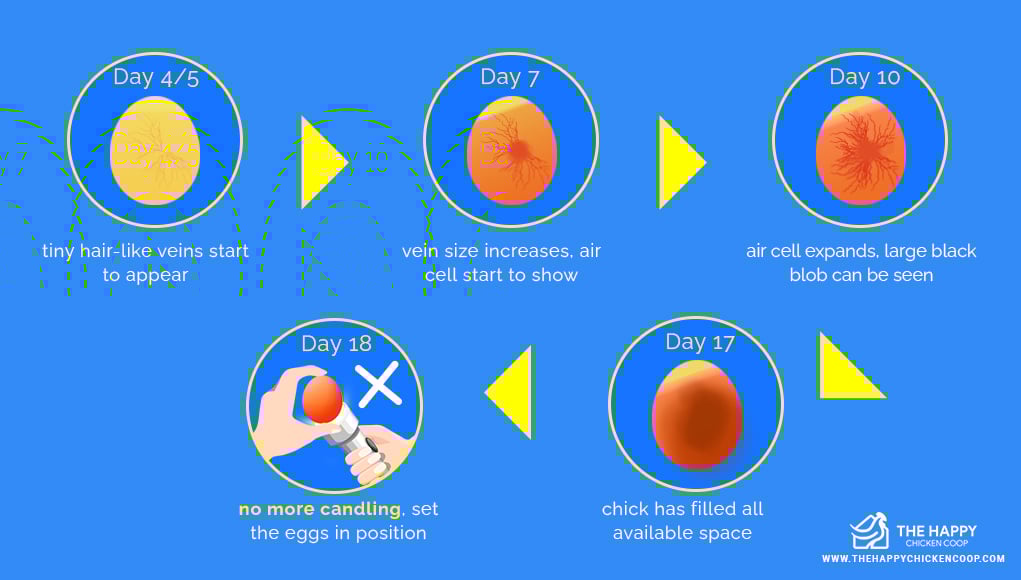
Day 4/5– by now, you should be able to see tiny hair-like veins spreading through the egg. If you can’t, don’t worry, put the egg back and re-candle at Day 7. If you can’t see anything, don’t be discouraged yet – patience!
Day 7 – should show an increase in the size of the vein web. You should also see the start of the air cell at the blunt end of the egg. Try to candle all the eggs on Day 7.
Day 10 – things are getting exciting now! The chick has filled up a lot of the space, the air cell has expanded, and you can clearly see the eye. The eye is a large black blob – huge at this time. You may see some movement too!
Day 17 – you won’t see much happening here. The chick has filled all available space and is slowly moving into a hatching position. Avoid moving the egg around too much as the chick needs to orient itself ready to pip.
Day 18 – no more candling! Your eggs are now on lockdown. Remove the automatic turner and set the eggs in position. The rest is up to the chicks.
Being The Detective!
As you are learning the new skill of handling, you will be surprised at how easy it all becomes after a relatively short period of time.
The secret to your success will be keeping good notes on every egg. You should note the temperature and humidity of the incubator, day #, air cell size in your notebook. Some folks note the ambient temperature and humidity too.
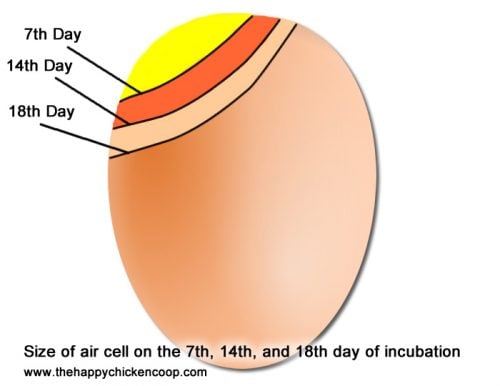
Perhaps one of the most important pieces of information is the size of the air cell. We have talked about this briefly in other articles, so that we will expand a little here.
Regardless of whether you decide to do a ‘dry’ hatch or a ‘wet’ hatch, the air cell inside the egg needs to expand sufficiently to give the chick enough air to breathe before external pipping.
The egg will need to lose 13-14% of its’ total weight by Day 18 (lockdown). This should ensure there is sufficient air for the chick to breathe when it pips internally.
The diagram below gives you a great idea of how big the air cell should be:
If you have been able to separate the eggs into individual layers, that is most helpful, especially if you suspect your hens or rooster aren’t fertile.
A reference book such as Ms. Damerows ‘Hatching and Brooding your own chicks’ is an excellent resource to help determine what went wrong. There is a whole chapter devoted to determining what went wrong and how to improve your success in future hatching’s.
How To Identify Problem Eggs
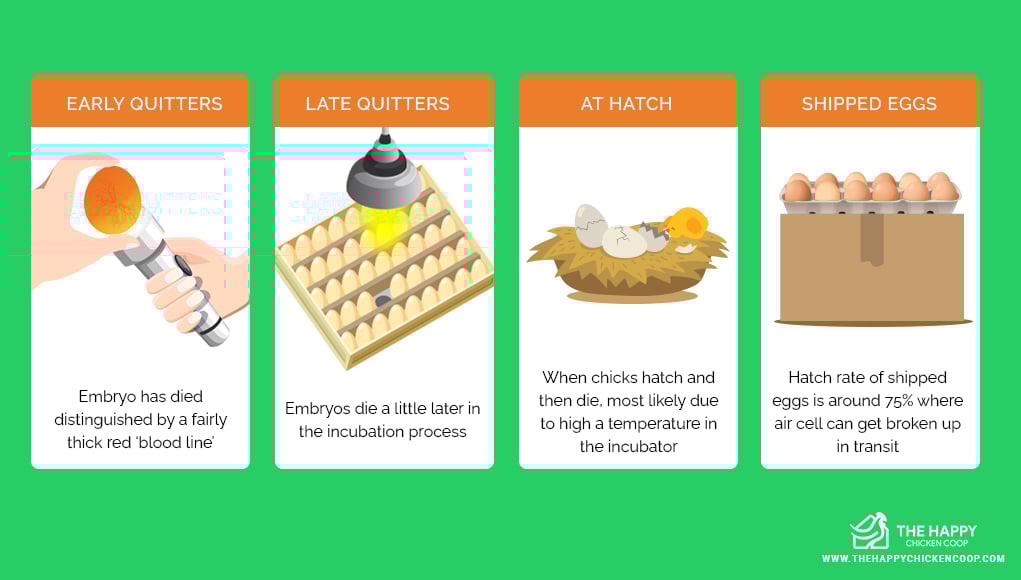
Early quitters
These are eggs that, for whatever reason, have stopped developing, and the embryo has died. Often you will see a fairly thick red ‘blood line’ when you candle.
Late quitters
These embryos die further along in the incubation process and using your newly acquired detective skills. You will be able to eliminate some causes of death.
At hatch
Very occasionally, you might find that several of your chicks hatched and then died once they had pipped. This is usually caused by too high a temperature in the incubator or leaving the chicks too long after hatching inside.
Shipped eggs
Shipped eggs can be prone to many problems, and the hatch rate of shipped eggs is around 75% on average.
When shipped eggs arrive, check them over for cracks, etc., put them aside, pointed end down, and let the egg settle for at least 12-24 hours.
Oftentimes the air cell can get broken up in transit and ends up looking like a saddlebag. Sometimes this air cell can coalesce back to its’ original size and form, sometimes not.
Types Of Candlers
You can spend less than $5.00 on a small flashlight that will do a good job of candling, or you can spend a lot of money on a high-end article that can photograph the eggs for you.
If you are doing this as part of a school project or you want to hatch out multiple eggs, it may make sense for you to invest in some good-quality equipment.
Best picks
| Style | Features | OUR RATING |
|---|---|---|
 |
Brinsea High-Intensity Egg Candler
|
See Price |
 |
Titan Incubators High-Intensity Egg Candler
|
See Price |
 |
Magicfly Bright Egg Candler LED
|
See Price |
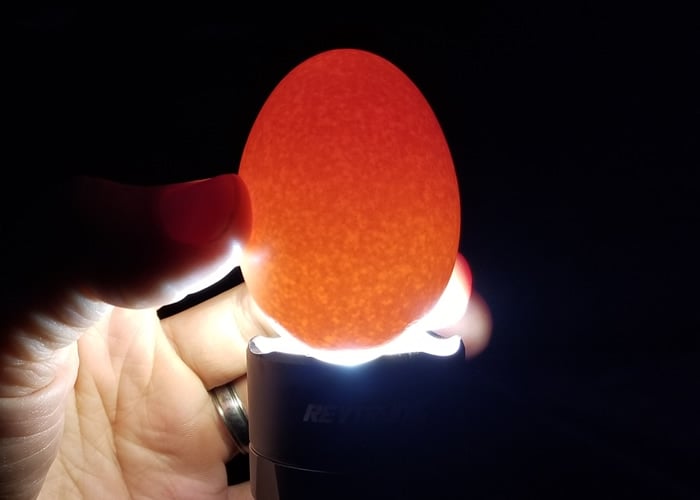
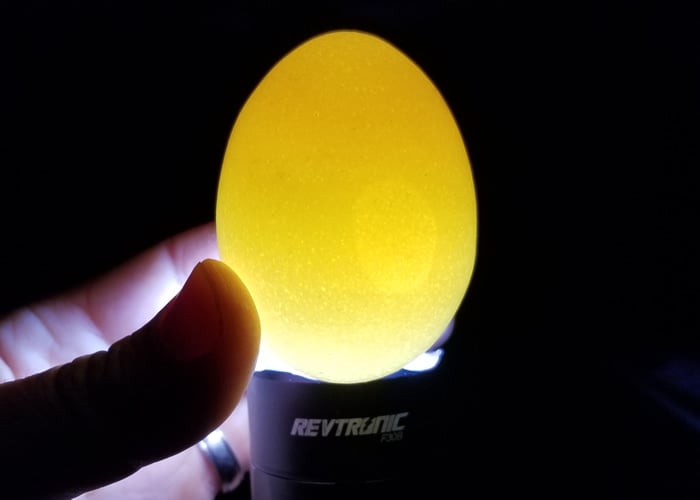
As I mentioned at the beginning of this article, you can make your own candler using an LED flashlight and a piece of cardboard.
This can save you a lot of time and a little money too. I have provided examples of using an 800-lumen flashlight on white, brown, and blue eggs below.

Here’s a short video on the ‘how to’ candle as well.
Summary on Egg Candling
Candling can be fun and interesting, especially if you have kids. It’s also a skill that will help you with your hatching proficiency in years to come.
The initial learning curve of learning to a candle can be frustrating but stick with it – it really does become easier with practice!
When hatching eggs, make sure you only hatch like with like. You really cannot successfully hatch chicken eggs with duck, turkey, quail, or others.
Each egg has its’ own time frame for hatching, and juggling around two or three different types of egg in one incubator is not likely to be a resounding success for you.
Good luck with your candling and hatching! Once they hatch, be sure to read our guides on raising chicks here and here.
We hope you enjoyed learning about candling, and perhaps you learned something too! Let us know in the comments section below…
Disclosure: We may earn affiliate commissions at no cost to you from the links on this page. This did not affect our assessment of products. Find full disclosure here.


But how do you candle an tiny white egg?
Candling guide does not change because of size of egg, just be sure to stop candling after the suggested amount of days.
Claire
It is quite common for a baby chick to make a small hole in its shell and then get stuck in that spot. If this happens, what should you do? You have probably heard the old saying, “never help a chick out of the shell or it wil die”. This can be true, but it can also mean certain death to a chick if you DON’T help it out of it’s shell. How do you know if you should help it and how? The answer coming soon.
I’ve assisted when possible. There’s only been ONE instance where the chick inside did not survive once hatched and that was because of a deformity. All of the rest I have assisted out of the eggs have gone on to be as happy and healthy as their siblings. So many things can go wrong inside an incubator. For instance, on my last hatch I had to help 3 out of their eggs because they had pipped too large a hole and due to their positioning right underneath the fan, it had dried out their membranes despite the humidity being super high. If I hadn’t helped, 3 perfectly healthy little Seramas wouldn’t be here today and would have died inside their eggs through no fault of their own. I understand that it’s a personal decision but for me, I will always assist if there seems to be a viable chick inside.
Hi! I noticed you hatch seramas. Is there a particular candler that you prefer for your serama eggs?
Thanks for the information! What should I do if the air cell is at the pointed end of the egg on day 7?
Hi, thanks alot for the articles but would like to ask; is it possible to tell if the egg is fertile before it is put in the incubator?
Is it possible for eggs without laid roosters to hatch?
Is it possible for eggs laid without roosters to hatch.
NO. The only exception is if the hen had been with a rooster within 10+- days, she could still have some semen in her making her still fertile.
Because it doesn’t enclose the egg, dark shells such as the chocolate brown Marans are very difficult to candle, even in a darkened room.
What is highest temperature of which turkey eggs incubate without getting damage.?
I am having a big problem with Pekin eggs sent through the post . I have three eggs that are developing but unfortunately they have a saddle shape aircell! So I have put them pointy end down there now day eight. Last night I could see a little speck moving around in 2 of them. I am worried when it comes to the hatch of the chicks about the Aircell situation, any advice would be very welcome.I also have two broody chickens at the moment both trying to sit on the same nest. At what stage should I re-introduce the hatching eggs.
I have a lot of double yolkers from my leg horns. Is that a problem for trying to incubate them?
Hi there! I’m hatching my first chickens ever, as a project w
ith my children.
We have 8 days left, and I’ve just realized that the pointy end should have been DOWN and we placed it UP. 😭😭
What should we do??? Leave them be, or flip them over? They have been in a fully automated incubator, turning them.
I recently hatched my first egg using the techniques described in this guide. It was so much fun and rewarding to see the embryo develop and eventually hatch. Thank you for sharing this comprehensive guide – it was very helpful and easy to follow!
I never knew that egg candling was such a simple and fascinating process! This guide is incredibly helpful in demystifying the process and making it accessible to beginners. I’m excited to give it a try and see the different stages of egg development for myself. Thanks for sharing!
I never knew that egg candling was such a simple and informative process until I read this guide! As a beginner, I appreciate the clear instructions and the pictures that illustrate each step. I can’t wait to try it out and see my eggs in a whole new light. Thank you for sharing this valuable information!
Wow, this guide is incredibly helpful! I’ve never done an egg candling before and was unsure where to start. The step-by-step instructions and pictures make it easy to understand and follow. Thank you for sharing your knowledge and experience with us!